Showing posts with label sewing. Show all posts

Tuesday, June 4, 2013

Ruffle Dresses

DSC_0008 (2) 5x7

I made the girls matching summer dresses for no special occasion, just for fun. Then, we got up a half hour earlier than usual before church and snuck off to do a photo shoot.

DSC_0036 5x7

DSC_0009 5x7

This was my first time working with ruffle fabric, which seems like it was everywhere a couple of summers ago. I found both colors on clearance on fabric.com for a couple of bucks a yard. Just like with every fabric, there are pros and cons. It allows some shortcuts that regular fabrics don't, such as no hemming at the bottom, but because they are pretty much striped, I had to line up the stripes at the side seams, evening out the amount of time. Also, it's a stretch knit polyester, and I was able to fold over and topstitch the necklines. 

DSC_0017 (2) 5x7


I didn't use a pattern, just traced around dresses that we already have.  I accidentally cut the black dress a couple inches too short.  I was going for below the knee so that she can wear it again next year, but forgot that with the sash, the dress would be pulled up at the torso unless she bothers to adjust it and pull the dress down, which a 7 year old won't do.
 
The ends of the sashes are the selvedges, or didn't need finishing, which saved time.  Also, I was expecting the black dress to require at leas a half slip underneath, but was surprised in the sunlight that it didn't. 
 
DSC_0024 5x7

DSC_0028 (2) 5x7

Each dress with sash took me about an hour and a half total. I cut dolman sleeves, so each dress is just two pieces.  The sleeves on the yellow dress were too long when she tried it on, so I hemmed them. The black dress sleeves were perfect, so I just left them, trimming a couple of ruffle points that stuck out.  That was a nice time saver with this fabric.  All in all, I am pleased with the outcome!

DSC_0005 5x7


DSC_0020 5x7

DSC_0014 5x7

DSC_0010 5x7

Monday, June 3, 2013

Baby Boy Ware

My little sis just gave birth to her first baby, Ezra.  Here are some things I made for him...

My sis chose the fabrics for all of these projects.  It was refreshing to work with skulls and tattoo fabrics--a change from the usual florals and baby blues that baby stuff is usually made of.

Skulls Quilt
DSC_0028


DSC_0027

The graphics fabrics were both by Michael Miller via fabric.com.
DSC_0041 (2)
 
DSC_0036
a little wave design
I used some awesome gray chambray for the backing and piecing. It was the first time I'd used chambray or apparel weight on a quilt. There was some expected stretching where quilting weights are more stiff, which showed up on my quilt back, but it was no biggie to fix later.
DSC_0035

 
This was the first time I tried a rollover binding (is that what it's called?) where you roll the backing fabric over the quilt top and topstitch. A HUGE timesaver. I was pleased with the look, although I did notice some waving in the quilt that I think is characteristic of this kind of binding. Again, no biggie.
DSC_0047

 
Reversible Car Seat Canopy
Made of Alexander Henry Zen Charmer fabric (blue) and Michael Miller Knitty Gritty Skull in mud.
DSC_0006

DSC_0005

Nursing Cover
DSC_0004

Minkee Blankie
The tattoo fabric is Alexander Henry tattoo fabric. Becky's husband runs his own tattoo shop in Hawaii.
DSC_0002

DSC_0001

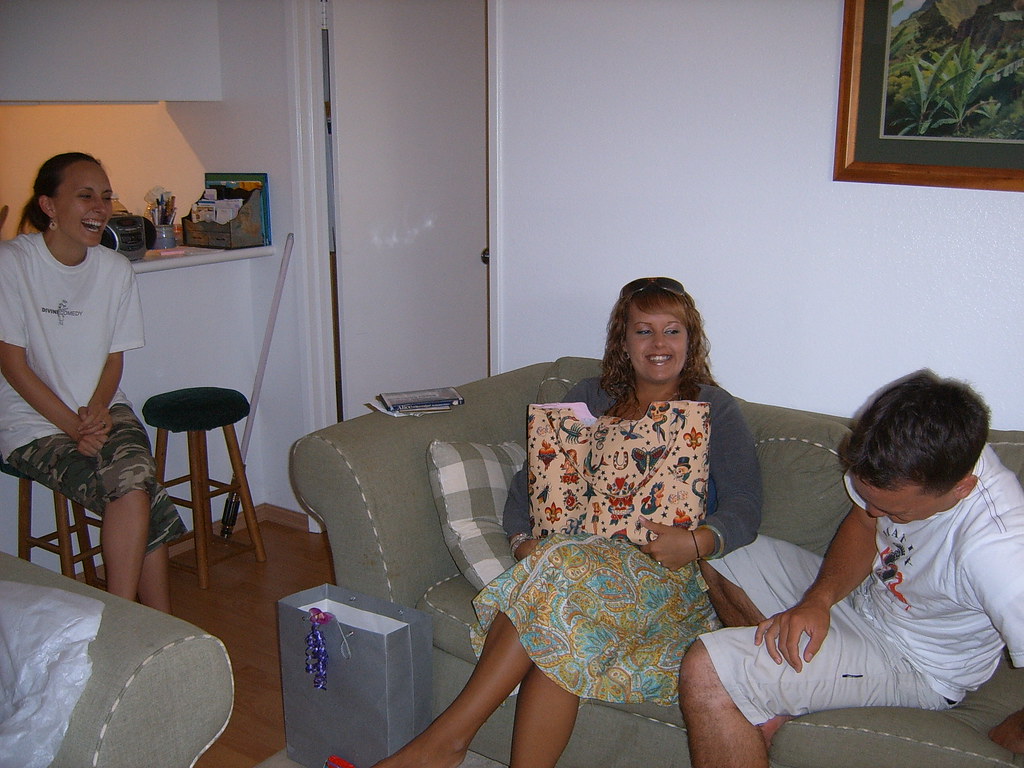
I found the photo below in my Flickr archives. My sister is holding a bag I had ordered off ebay made of the same Alexander Henry tattoo fabric. It was a miracle that we found enough to make the blanket 7 years later, as it has been discontinued for years.  That's me, my sis, and our brother back in July 2006...I'll try and get some baby photos up on here of little Ezra...he's a dream!
SUC50383

Monday, March 4, 2013

Wiksten Tova Top

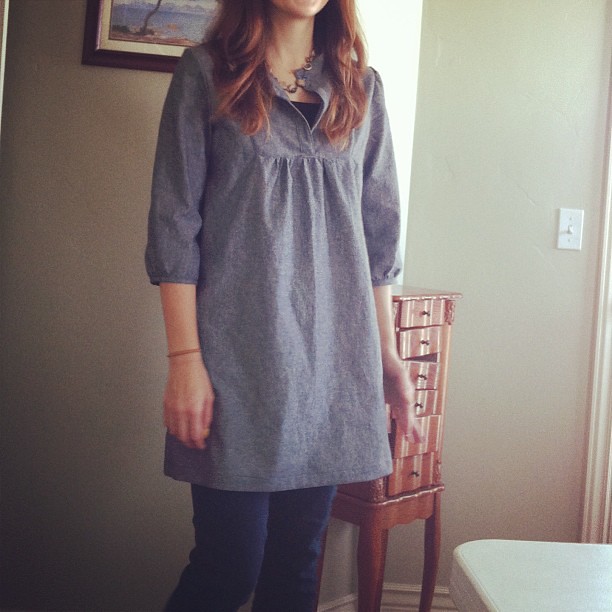
Wiksten Tova Top

I'm probably the last person on Earth to sew a Tova Top.  Wikstenmade's been on my blog roll for years, and I remember when the Tova Top Pattern came out.  I had found Jenny Gordy's blog via ellybeth on Flickr back in 2007.  I used to love ellybeth's handmade clothing and the fabrics she used.  Now she has her own line called Garment House.  The two ladies did collaborations on patterns, like tops with Peter Pan collars.  Both ladies are extremely talented.  Anyway, I couldn't afford the Tova paper pattern when it came out, and to be honest, I thought it would look too "maternity" on my figure.  Then, a year or two ago, the pattern became available in pdf for $10 and everyone was blogging about it, making three or four, etc.  I guess you could call it peer pressure, but I had to try it...

Wiksten Tova Top

I got the chambray fabric at WalMart for less than $6/yard. I cut size M.  My measurements called for a size L, but I read on line that the chest area would fit more nicely if you go down a size. I cut the dress length, but think I will be shortening it to hip length. I just wanted to test out the dress length. Overall, I am pleased with the fit, especially at the shoulder, armhole and yoke area--a nice "professional" fit--less baggy than the Simplicity patterns I am used to. 

Challenges
  • Attaching the inset. I had read that the inset was the hardest part, and it was, but not impossible. It's the corners of the inset that are difficult to catch as you sew, as there is a slit at each corner. So, unless you're used to doing it, it just will take a little finagling and working. Next time, I won't cut the slits quite as long.  I think I cut 1/4" long slits, maybe I will do 1/8" slits next time.
  • Topstitching the inset at the bottom center.  I had to redo my topstitching at the area at the bottom of the placket on the inset. There's so much fabric there that getting over this "hump" without wobbling the topstitch line was difficult. I have a relatively cheap machine, and think that a sturdier machine would have less of a problem.
I made a tunic blahhhhh #tovatop #wiksten #shescrapfty

What I'll Do Differently Next Time
  • Armholes and sleeves. I think next time I will cut more sleeve fabric on the side that is set to the armhole so that there are more gathers at the armhole. One sleeve had more gathers than the other...maybe I stretched out the armhole on the one. 
  • Add buttons. As of now, I wear a camisole underneath.I may add a couple or more small buttons on the placket. 
  • Use thicker thread for topstitching. I used cheap black thread this time.
I got lots of compliments when I wore it to a girls' night. It was the first time someone asked me where I bought my top rather than the infamous, "Did you make that?" said in a 'how cute' tone with head tilted to side.  Someone else said they'd been eyeing my top all night, and how nice dress shirts are so hard to find these days...it made me blush, and now I want to make more!

Wiksten Tova Top

Thursday, February 14, 2013

Another Simplicity 3835

Simplicity 3835

The first time I made it was in 2008. Here, I've paired with a cashmere cardigan by Camaïeu that I bought on my mission in a town called outside Geneva called Annemasse.  On P-Day (missionaries' off-day) eight of us sister missionaries would meet up in downtown Geneva or a nearby town and go (usually window) shopping and get lunch at a yummy restaurant.  I've had the cardigan since 1999 and I just won't get rid of it. It seems to get softer and more meaningful with time.

About the pattern...this time, I made the high collar with invisible zipper in the back.  The last time, I did the easier and lower elastic/gathered neckline.  This was my first time wearing such a high neckline that's not stretchy knit fabric and it choked me a bit when I would sit down.  I took the kids to the library for toddler wiggle time and spent a lot of time on the floor with it digging into my throat.  Okay, so it wasn't the best floor-time activity dress. Plus, I was wearing knee high boots. Live and learn!

Also, I shortened the sleeves a couple inches.  These photos aren't very revealing, but I'm sure you've seen this popular Built By Wendy dress so many times, you'll get over it.

Simplicity 3835
 

Thursday, February 7, 2013

Infinity Scarf Tutorial

Title 3

Title ii
A scarf is an easy way to brighten cold-weather outfits as spring approaches.  If you can sew a straight line, you can sew one of these infinity scarves in 15-20 minutes.  You might want to make 10 in an afternoon to mix and match with your wardrobe.

Choosing a Fabric
...the best part, right?  Typically, for spring/summer scarves jersey knit, cotton lawn, voile, chiffon, challis (almost any lightweight polyester), and even medium weight quilting cotton will work. For fall/winter jersey knits and sweater knits you buy off the bolt work well too. You can really use anything that has a nice drape, soft hand, and colors you like. The fabric I used for this tutorial was a light weight cotton double gauze.

If you're not sure where to look for scarf fabrics, Fabric.com has a $1.95 section that sometimes has decent lightweight sweater knits, jersey knits, and polyesters that would be perfect for making an infinity scarf.  I found this poly knit fabric at WalMart for $1/yard.


1-Cuts
These are basic measurements. You can take either your cloth measuring tape or the uncut fabric and wrap it around your neck a couple of times to see exactly what length you want.  Draped only once around your neck, the bottom of the scarf should reach a couple of inches below your belly button. Again, these are basic measurements.  If you want to triple up a scarf add about 10 more inches.  Another style is a single tight scarf.

Generally, it's easiest to use a fabric that is between 54"- 60" wide. That way you only need to purchase about half a yard to make one scarf.  Or, you can purchase two yards, cut down the length of the fabric, and make a few extras as gifts.

2 -fold in half lengthwise
If your fabric is striped like this one is, you should match the stripes up as you sew, especially if your stripes are large/wide.  Mine are so small that I didn't bother.
 
3-layout right side out

4-pull

4.5-keep pulling

5-match seams
  
6-pin and sew
 Make sure to back stitch when you begin and end sewing so that the hole won't spread open.
 
7-pull through hole right side out

8-slipstitch shut
 If you need instructions on how to slipstitch, check out this video.
 
Untitled

Untitled
Let me know if you have any questions.


Friday, January 25, 2013

Chambray Bag for a Friend

Chambray Bag

So, I have a dear friend, Miriam, whom I met at BYU Provo 10+ years ago who sent me one of my favorite Christmas gifts and cards last month.  It was one of those gifts that takes you by surprise and melts your heart.  I just had to make her something--not as payback--just as a token of my appreciation. 

Chambray Bag

It was Miriam who put me in touch with her friend Dana from MADE years ago when she was selling custom made car seat covers.  Dana gave me pointers on one I was making for my sister in law, and I started following her blog, which inspired me with countless projects.

Chambray Bag

I ordered the chambray fabric from a vintage fabric ebay shop. It's home dec weight, thicker than the chambray meant for clothing...perfect for a bag. I lined it with a cotton lawn.

Chambray Bag
 
Chambray Bag

Wednesday, January 23, 2013

Quilt Blogs

When I began blogging 6 years ago, my main topic was of course my first child, Keira.  I wanted to share photos with my family back in Hawaii (parents, siblings) and include commentary.  My family didn't really catch on to the blog thing and I was still working then, so had little time to blog.  I hadn't begun sewing yet.  When I started sewing a few months later I came across some sewing blogs and fabric designers which have now become become gurus of the sewing and quilting worlds.  Sites that got and still get me inspired:  Heather Bailey, Amy Butler, Anna Maria Horner, Sew Mama Sew, Sew Liberated, and countless others sewists' blogs.  These sites made me want to show my creations to the world and maybe make some connections with other sewists who were trying to sew the same things or just had a nice thing to say about my creations.

Initially, my sewing consisted mostly of using quilting fabric to make baby stuff like nursing covers, mei tai baby carriers, and baby clothing.  Check out my Flickr 2008 photos of my creations here.
My stash
My fabric stash in 2008
My sewing slowly evolved into sewing clothing for myself using patterns, refashioning, and tracing clothes I already had to reproduce them.  I never really got into quilting until I made my first quilt 2 years ago.  Since then I've had another baby and have been busier (more tired) and less likely to pull a late night to finish a project.  However, nowadays I find myself more drawn to quilting than before.  Quilting has become a breath a fresh air into my sewing life for a few reasons:
  • I sew less for my children now that they are less 'baby' and more 'kids.' 
  • The clothing I've made fore myself, both using a pattern and not, have been more or less disappointing in the end and they end up in the back of my closet.  (Let's face it, shedding a few pounds would alleviate that problem!) 
  • I have a 6+ year old fabric stash that I've been more apt to pull from and whittle down than to add to, and a quilt is, well, the best use for quilting fabric, ain't it?
With that said, let me get to why I've even chosen this topic to write about.  Since moving a couple of months ago, I've been more drawn towards sewing and even my blog.  Our master bedroom is large enough that I've fit a 5' long table at the end of our bed and set up shop there for all my projects.  No longer is the family forced to eat on the couch because my fabric and sewing machine are dominating the kitchen table.  Also, it's freezing here, like, in the negative degrees more than in the positives for a month now, and we are more homebound than ever, which, owing to Netflix, sewing, and preschool lessons by Mum, we are able to put up with for another couple of months till Spring. 

Just swimming to the car #vernal #freshpowder I would live to dive into it!
Swimming out to the minivan in a foot of snow a couple weeks ago
So, to get my blog more exposure, I've added it to a couple of lists of quilting blogs:
QuilterBlogs
Quilter Blogs is a site where you can read other quilt blogs' posts all on one feed.  Like Google Reader and other readers, it's updated as blogs on the quilter blogs list post them.  Pretty nifty!

Quilting Gallery Logo
Quilting Bloggers is another site that helps you promote your blog on a list, as well as links you to quilting resources for quilting shops, organized swaps, and classes.

I'm also trying to get more involved in Sew Mama Sew scene.  I've participated in their giveaways before, but that's about it.  Their site has helped put me in touch with other sewists and provided many a tutorial when I was in a crunch. 

Also, if anyone is on Instagram, please come follow me @nanceykl (my personal feed) or @nanshoo (my wannabe professional photographer feed).  Check out my link in my sidebar.  Aloha `oe for now.
Related Posts with Thumbnails